Showing posts with label 3dsmax. Show all posts

Friday, February 10, 2017

Links, enlaces et liens

http://boutique23.com/
Some cool rigs on sale!


https://vimeo.com/groups/gameanimFollow this group for some cool demo reels!

http://www.cgmeetup.net/home/deadpool-visual-effects-breakdown-by-atomic-fiction/
Nice breakdown from the Deadpool film

http://ryanwoodwardart.com/animation/
I think I've shared this before but it doesn't matter, still worth the reshare! :)

https://knowledge.autodesk.com/support/3ds-max/learn-explore/caas/CloudHelp/cloudhelp/2016/ENU/3DSMax/files/GUID-75E03BAB-0D94-43E0-B281-3AE3299BD2B9-htm.html
Some alternative options for those that are using 3ds max

https://www.iamag.co/features/disney-real-time-skeletal-skinning-with-optimized-centers-of-rotation/
Cool tech for skinning. From Disney, nonetheless :P

http://thinkinganimation.com/new-free-rig-mr-buttons/
Free rig!! Check a test run done by Kyle Kenworthy below...

Mr. Button's Bow Tie from Kyle Kenworthy on Vimeo.

Wednesday, July 1, 2015

Paul E. Neale Track Editor tool for 3dsmax FREE

Go to this link, watch the tutorials, be amazed (and wonder how come Autodesk hasn't implemented something like this before), download it and install it.

http://www.penproductions.ca/scripts/trackEditor/

Crazy tool!

Enjoy!


Saturday, May 2, 2015

Intro To Character Rigging by Paul Neale

This is a long video but totally worth it. The video explains rigging in 3dsmax, but a lot of things are applicable to other 3D packages.

And if you're not following Paul in Youtube or Twitter, you're missing a lot of cool tips.


Friday, September 5, 2014

penQuickSelect from Paul Neale

Interesting little tool for 3dsmax.


Robocoaster animation demo- Inventor workflow to 3ds Max Design 2012

This tutorial has a little bit of everything, I believe. Technical and artistical. Worth watching.


Saturday, April 12, 2014

SuperRune - Super Simple Rig

I was looking for a auto-rig script for 3ds max and I found this great script called Super Simple Rig, from SuperRune.

The Pros are that is that the script is really solid and well done, and the rig includes eyes and jaw by default (though you can remove them from your setup if you don't need them). With a click of a button you can create a rig and deleted if you don't like it. It uses locators to setup the bones and the PEN attribute holder script is present in all the controllers, which is a nice way to create pose libraries. And it's free.

On the Cons side, the fingers are a bit hard to setup, since the script does not take into consideration the rotations of the locators (so the orientation axis of the controllers is calculated by the position of all the related locators). In addition, the setup options for the spine are different from what I have seen so far, and there is no option for IK/FK spine control (there is one but the IK and FK are active at the same time).

There are not a whole lot of rigging scripts out there for 3ds max (not really needed since there is CAT and Puppetshop), but if you're looking for some additional customization, give it a try. You won't be disappointed.


http://www.superrune.com/tools/supersimplerig.php

Cheers!

Sunday, March 23, 2014

3ds Max tips and tricks: Cheating your Animation with Procedural Noise

Great little video on how to cheat animation using the procedural noise.


Cheers!

3ds max scripts to modify the timeline start and end values

I created a couple of scripts that allow me easily control the start and end of the timeline. They are fairly simple and will save you a couple of seconds each time you want to change your timeline.

I would normally use the CTRL + ALT + Mouse buttons to change the values or move the timeline (with the middle button), however, when working on long scenes, it can be a bit of a pain to a frame as start or end.

So this little scripts will do the job. Here's a brief description so you know what each script does:
  • UpdateStartZero: It will reset your timeline start value to Zero.
  • UpdateStartTime: It will update the start value of your timeline to the current position of the slider. So, let's say your timeline goes from 0f to 500f and you want it to start from 333f. Just place the timeline slider to frame 333 and run the script.
  • UpdateEndTime: Same as StartTime but for the end value.
I'm planning to create some other scripts to update the end value further from the current value (i.e., to change it to 500f if your timeline currently goes to 400f) and to offset the whole timeline by a certain value, but I'll see if I need them.

If you want more control, you can also try the timeline script that is part of the JJTools package. Actually, I recommend to install the package regardless, it has some REALLY useful tools, like the Clever Move and Rotate.

Installation

As with most of 3ds max scripts, just drag-n-drop the files into the viewport. I would recommend you put them in one of your Quad menus for easy access.

Downloads

UpdateStartZero
UpdateStartTime
UpdateEndTime

Cheers and have fun!

Monday, December 9, 2013

3dsMax viewport lags a lot. What to do about it.

I recently had a problem with 3dsmax where the viewport was super slow. No matter what I did, it took several seconds for the viewport to refresh. I had around a million and a half polygons in my scene, but the PC at work is not the average machine: The hardware I have is top notch.

At the beginning I thought the problem was that the buildings in my scene where instances of other buildings and each instance was actually a group, not a single object. After taking the time to convert each building into a unique object, the scene was still laggy.

So, the next step was to turn into the drivers. In the past, I have fixed some viewport problems with them, but in general the default D3D (short of Direct3D) driver is good.

So, I started delving into no-man's land and I realized that, in addition to the D3D and OpenGL drivers, there was a new boy in town. The third option is a new driver called "Nitrous". I asked Google is he knew about it, and of course he did.

Nitrous is a new technology developed by Autodesk that is supposed to be better than both of the previous instances. My PC at work didn't have the option to select it, I had to revert the current D3D driver in order to get the option.


Once I restarted Nitrous, the difference was impressive. The lags were noticeable less laggy and the overall feel of the viewport was smoother.

So, if you have problems with your viewport, check your driver (after you have check your scene first!). Please note that I'm not sure since when the Nitrous driver is available. I have 2012 version installed, so I can't confirm if previous versions support it.

Here 's the link of the post that I checked in order to fix this problem.

http://forums.autodesk.com/t5/3ds-Max-3ds-Max-Design-General/Nitrous-direct-3d-or-OpenGL-as-display-driver/td-p/4287853

Cheers!

Friday, November 22, 2013

Improve your workflow: Easy steps to make 3ds max (more) user friendly

Note: I will be updating this post whenever I find a tool that could impact your workflow and help you work faster. So, bookmark this page so you can check it later.

When I was at the 3D school, my favorite program was 3dsMax. I thought it has some features that could be better, but overall the ups where more than the downs. Then, I left school and get my first job and my first project was using Maya. And I have to say I was reluctant to make the switch, but after a while

Maya is my favorite 3D program. Coming in a close second is now Motion Builder. Sadly, the one that was my favorite is now third in my rankings. That's 3ds Max. This is mainly because I find that my workflow is slower than with any other software. Some tools (in my opinion) are poorly designed and they impact my workflow.

However, there are some things you can do to speed up and enhance your workflow.

Changing the hotkeys in 3dsMax to scrub the timeline faster

This set of hotkeys will increase your workflow so that all the playback controls will be together.

- Change the default Next/Previous Key hotkeys (by default, they are assigned to the "," and "." keys) to the Left and Right arrows.

- In 3dsMax and map the KeyMode Toggle function (known as "NextPrevious Key Mode Toggle") to the Down Key, so that you can easily switch between Next/Previous frame to Next/Previous Key.


- Change the hotkey of the UP Arrow key to play the animation.

Zooming in the Graph Editor

These set of changes in the Quad Menus will greatly improve your zooming workflow in the graph editor, making it a bit friendlier.

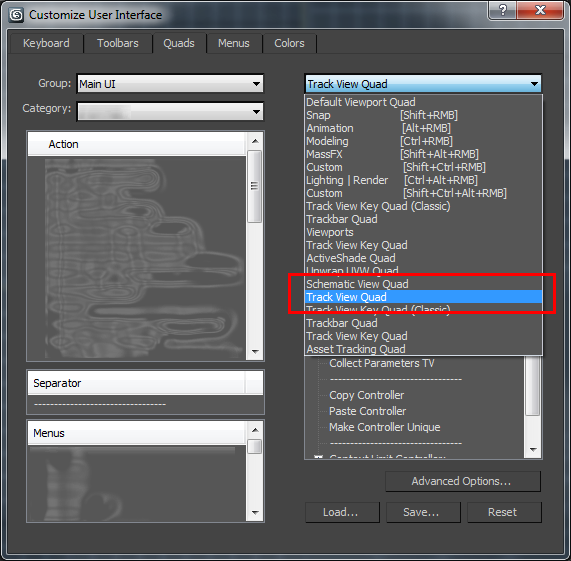
First, let's find the correct quad, since there are a couple with similar names.


Now, how to set it up. I'll show you what looks mine:


I added a couple of zooming and key-moving tools to help me out when I'm working on the Graph Editor, which is, like, all the time. Where to put the tools is up to you. I place them in that particular order for no reason really. You can do the same or find some other one that suits you better.

The Zooming tools (Values and Time) will help me zoom in one specific direction at a time. The Move Key tools do the same thing but with selected keys. So, Move Keys Horizontally will move keys in time only, while vertically in value only.

NOTE: CTRL + SHIFT + Zoom Tool will disable the default proportional zoom of the tool, hence achieving the same effect but I feel you have less control over the zoomed area.

Make the hotkeys work in the Track view

If you want to enable most of the hotkeys so they also work while the Curve Editor (or any trackview, for that matter) just activate the Keyboard Shortcut Override Toggle (toaster button).


Change position of Scale Value bar with script

I have recently uploaded a tool to update the position of the scale value tool bar in the Curve Editor. Don't know what I'm talking about? It's the annoying brown line that is always hard to find. Well, get teh tool and install it. It will save you time, guaranteed! ;)

Trajectories made better!

If you already don't know about Eric Legaré DTools, then you're missing a lot! Especially the trajectories tool called DTrajEdit. Basically, it's like the default trajectories, but better. You can even attach a trajectory to a polygon on your mesh! How cool is THAT!?

Link here

Tween Machine for 3dsMax

A friend of mine just shoot me a link about a "Tween Machine" script for 3dsMax. If you don't know what that is, it's basically a tool that existed in Maya (a script made by someone) that allows you to easily add inbetweens into your animation.

Well, it happens that artist Michael Smith created the same tool for 3dsMax.
Head over his website and check out his tutorials.

Link here.


Edit value of Scale Value bar in 3ds Max


Hello fellow animators,

I’ve just finished a tool to help you with that crappy Scale Bar that we use in 3dsMax, that one to scale. Don’t know what I’m talking about? This bar:


The problem with this bar is that I generally find myself moving it around in order to scale the keys in the Curve Editor. “What’s wrong with that?”, you may ask. Good question! Every time the Scale Values tool is selected, 3dsMax saves its previous position, so if I was editing some keys at -100, and now I want to edit some other keys at +300, I have to go all the way down to go fetch the damn bar. Sure, I can close the Curve Editor and reopen it so that the bar position is reset to its default (value = 0), but I still have to move it from 0 to 300 (or whatever the value is). All this process annoys me.

So it’s been a while that I wanted to code this little script and now that I have some time I finally did it. To install, follow these steps:

  1. To run the script, just go to the Maxscript menu and select “Run Script”. Then select the script and click OK.
  2. Now, let’s put the script in a quad, shall we?
  3. In the Customize menu, select “Customize User Interface” to edit your Quad for the Curve Editor.
  4. Select the “AnimTool” category. The script name is… Well, the only script in the category… “Edit Scale Bar”.
  5. Drag and drop it into the Track View Quad (see image below). You can put it into any of the four available quads, no worries.
  6. Close the Customize window.


So, in order to use:

  1. In the Curve Editor, select the Scale Values tool (Keys menu).
  2. Right-click in the hierarchy panel, NOT WHERE THE KEYS ARE. If you Right-click on the side where the keys are, you will deselect the Scale tool, so the script becomes pointless.
  3. Enter value. Press Enter.
  4. Refresh your Curve Editor. This is a bit annoying but I couldn’t find a way to automatically refresh the Curve Editor window after the script. You can refresh it manually just by using the middle mouse button to pan the window.


An ALTERNATIVE way is to move the scale bar BEFORE selecting the Scale Values tool. For this you can just Right-click on the side where the keys are, select the script, enter the value and then select the Scale too. The bar will appear at the corresponding value.

So, after you have read the whole thing, here's your link to download it. ;)
Cheers!

Wednesday, July 4, 2012

3ds Max vs Maya: Part 3, Everything else!

The final part of this (looong) review is... EVERYTHING ELSE!! I will compare some animation related features on both programs and show some other things that one program has but the other does not.


Trajectories

This feature is some of the most important ones in 3dsMax or Maya. Trajectories show you the path of an object in the viewport. It's very useful for checking your arcs, for example.

In both programs, trajectories work pretty much the same way, but there are some options that differ from one to the other.

In Maya, the trajectory or Motion Trail is another object in the scene. You can select it and move it, scale it or rotate it. You can change the type of line you want (locators, point or line) and whether or not to display the frame numbers. That's pretty much it.

 Motion Trail options in ChannelBox


On the other hand, 3dsMax allows you to do much more. First, there is a sub-object level that allows you to modify the curve itself! This will affect the position, rotation or scale of the object. You can add or delete keys into the trajectory itself too. I believe this is pretty handy because it allows you to tweak the arc of the object by moving the trajectory.

Trajectory options in 3dsMax


In the end, both tools serve the same purpose, but I think 3dsMax trajectories tool is a bit more useful than Maya's.


Align Tool

Maya's Align tool is, in my opinion, one of the worst tools the program has to offer. I know a lot of people that just parent constraint two objects so they align to each other and then remove the constraint (more on that later). I mean, is not that the tool doesn't work or anything like that, it's that is not very user friendly (again, this is MY opinion, you might think differently about it and I'm cool with that).

Most weird align tool!


When you want to align two objects together, after you select the Align Tool from the Modify menu, there is this bizarre box that asks you what do you want to do with it, i.e. how do you want to align the two objects. I guess once you get a hold of it, it's easy, but lucky me, there is this little script that brings 3dsMax align tool into Maya. :)


3dsMax Align tool is much more simple and user friendly. It asks you what you want to do in a way you expect. It also snaps the two objects by default, so it's nice to see both objects aligning together when the tool is called. You also have the Quick Align tool that snaps two objects in position only, which is cool.

Well design align tool

For me, if not for the script I mentioned earlier, this one would be a 3dsMax winner by far.

Constraints

Constraints are used to make one object follow another object that is not it's parent. One thing to have in mind about constraints is that they overpower the real parent of an object. For example, Lets say Object1 is parent of Object2. But Object2 has a position constraint to Object3. The hierarchy for this example will look like this:

Hierarchy for parent vs constraint example

In this scenario, Object1 has no impact on Object2, even if its the parent of the object. Object2 will follow Object3 only because constraints overpower parents.


Constraints are very useful and they are heavily used when creating rigs.

Now, I won't go through every single type of constraint in each 3dsMax and Maya, but I could certainly make a comparison table.

Constraints comparison table

This little graphic shows the different types of constraints available on each program and a comparison of what are the different names for each constraint type. Both programs have pretty much the same types of constraints but there are some more specific constraints in each program. For example, the Attachment Constraint in 3dsMax constraints an object to a single polygon in a mesh (not all types of mesh are accepted though).

One thing that you will have already noticed is... Which is the equivalent of the Path Constraint in Maya? Good question! The thing is, in Maya, the path constraint is not in the Constraints menu since (I believe) is not consider a constraint but an attachment. You can find it in the Animate menu, here:
Path Constraint in Maya (not in Constraint Menu!)

Maya's Outliner

Outliner!


Maya's Outliner is a very underestimated tool, specially by newcomers or artists switching from 3dsMax to Maya.

The Outliner is a tool that will show you everything that is on the scene: from cameras, to lights, meshes, locators, etc. It kind of is the equivalent of a rig picker, but for the whole scene. It also allows you to do several things, like parenting two objects by drag-n-drop, remove constraints, find a specific object in a hierarchy, etc.

3dsMax 2010 version does not offer an equivalent for Maya's Outliner. I guess the Scene Explorer would be the closest but it doesn't match the amount of features the Outliner offers. There is a script for 3dsMax that creates a very similar Outliner tool that can be found here. Great tool and adds some new features that Maya's Outliner does not have, which is pretty cool.


Final Conclusions

Both 3dsMax and Maya have certainly some pros and cons, and in some cases one has a tool that the other does not have. However, I find that there is no real drawback in changing from one to the other. I know animators that produce high quality animation on both of them.

I guess the only thing that you have to get used to is adapting your workflow to work for both of them, which might be the case if you work in the video game industry.

One thing I would suggest to all artists that generally work with both programs: DO NOT CHANGE YOUR HOTKEYS TO REPLICATE THE OTHER PROGRAM. I did it before and it's a pain in the butt for someone else to show you something in your computer, since all hotkeys are messed up. Learn to differentiate both programs and imprint each set of hotkeys in your brain. If I did it, I'm pretty sure you can!

Thanks for reading!


Monday, May 21, 2012

3ds Max vs Maya: Part 2, the Timeline

I apologize for the delay in this post but I've been very busy at work and at home right now. I'll do my best to push the third post as fast as I can.

OK, next in line: The Timeline!

The Timeline, or TimeSlider, is the numbered bar at the bottom of the screen in 3dsMax and Maya. Lucky us, they both place in the same place!

3ds Max and Maya timelines

They both behave the same way, but your workflow can change drastically from one to the other. I learned 3D in 3dsMax and when I switched to Maya, it was one of the hardest things to get use to. It was not because scrolling the timeline was different or anything like that, it was because handling the keys in the timeline is way different.

You'll what I'm talking about... On to the review!


Scrolling

The way you scroll the timeline does not change between both programs. You still have to grab the timeline cursor and drag it through the timeline to watch your animation. It's the cursor itself that changes.

The way I see it, in 3dsMax the cursor is divided in two: The cursor itself and the Cursor Bar (or more appropriately called "Timeline Bar").

Timeline Bar and its cursor


Maya has a more simple approach, in the sense that there is no bar, you can drag the cursor itself in order to go through the timeline.

Maya timeline cursor

As I said, the principle is the same: Click and drag to move through the timeline. However, the means of doing it is different. In 3dsMax, in order to move the cursor you have to drag the bar instead. The cool thing about the bar though is that it doesn't change it's size no matter the range of the timeline, whether in Maya, the cursor will reduce its size in order to fit the range, which becomes a bit of a pain when working with big ranges (animations of 400+ frames).

Another thing is that the bar displays your position and the number of frames you have in the timeline, while in Maya you have a value beside the timeline which displays your current frame, but you don't have the number of frames of the timeline.

So Maya might have a simpler way to manage the timeline, but I believe 3dsMax is more friendly and easier to work with.

Navigating through the timeline using hotkeys

Both programs use the same hotkeys to navigate through the timeline: "," to step backwards and "." to move forward. The default setting in both programs in different though. In Maya, you jump through keys while in 3dsMax by default you jump through frames.

The difference is basically the way you switch between jumping through frames or jumping through keys. In Maya, to switch between these modes, you just have to add the ALT key to the hotkeys, so if you want to jump to the next frame, just press "Alt + .".

3dsMax has a special key to switch between the two modes, its called "KeyMode Toggle". It's located under the playback controls (see image).

KeyMode Toggle


What this button does is enables the "," and "." to jump through keys instead of frames. So this is the equivalent of using the Alt key in Maya.

Another thing to note is that clicking on the arrow buttons in the timeline bar in 3dsMax will have the same effect as using the "," and "." hotkeys, with the addition that whenever you click on them, the mouse pointer will move too, so you don't have to follow the bar when it jumps. Do it to see what I mean...

In this feature there is no clear winner but I do prefer the 3dsMax way. Personal opinion.

Displaying keys

This feature is another one where both programs differ a lot. In 3ds Max, every key in the timeline has different colors: Red (position), Green (rotation), Blue (scale), Black (for modifiers), etc. By filtering the type of key, you can work with one transform type at a time, without the need of the Dope Sheet or the Curve Editor.

Displaying keys in 3ds Max

Maya is different. The keys displayed in the timeline are called "Ticks" and they're only one color: Red. There is not much to say about it other than you can change the width of the ticks in the settings, in case you find them too thin. The tick represents a key in that frame, all translations and/or attributes.

Displaying keys or "ticks" in Maya

Note: I have realized that there are some attributes that are not displayed in the timeline, like the camera Focal Length for example. If someone knows how to display these attributes, leave your tip in the comments ;)

Now, there is a small difference in the displaying of the keys that not everyone will notice: The position of the keys in the timeline. In 3ds Max, when you place the timeline cursor over a frame, the cursor covers the entire key. In Maya however, you can see that the key tick is located beside the cursor. This might be a bit confusing when first switching from one program to the other, but no worries, they both work the same way.


Note: It's worth to mention that in 3ds Max, there is a way to display the timeline in a Frame:Ticks way. You just have to configure the display options in the Time Configuration window.

Changing timeline range

If you want to change the size of your timeline in 3ds Max, the easiest way to do it is to use the following combinations while your mouse pointer is over the timeline:

- CTRL + ALT + Left-Click: Change the start frame
- CTRL + ALT + Right-Click: Change the end frame
- CTRL + ALT + Middle-Click: Move the whole range forward or backwards (this one does not alter the size of the timeline, but the position in time of the whole range)

You can also do it in the Time Configuration window and enter the exact values you want.

In Maya it's a bit easier. You have input boxes where you can type the values you want for the start and end of either the timeline or the playback range. You also have a bar between these boxes that work just for playback, so you can easily adjust the playback range.

Timeline and Playback ranges in Maya


Keys management

The way you copy, delete or move keys within the timeline greatly affects your workflow, and as everything else in the timeline, there are some differences on how these two programs handle this feature.

First Copy Keys.

In Maya, there are two ways to copy one key to another frame. You can move the cursor over the frame you want to copy, RIGHT-click and select "Copy"; then move to the frame you want to paste the key and RIGHT-click to select "Paste".  The other way is to put the timeline cursor on the frame you want to copy, then hover your mouse pointer over the frame in the timeline where you want to paste the key and MIDDLE-click. You'll notice that the timeline cursor moved but the animation stayed still. You can now add a key by pressing "s" (default hotkey) to add a key and keep that pose.

In 3ds Max, there are also two ways to copy a key: The first method is to simply select the key you want to copy (in the timeline) and SHIFT-Drag the key to the frame you want that key. The second method is to move the timeline cursor to the key you want to copy, then RIGHT-Click drag the timeline bar to the frame you want to copy the key to. Once you release the mouse button, a pop-up window will appear asking you which translate you want to key. Press OK and you're done.

As you can see, all methods are slightly similar, which make it easy to confuse with one another when switching programs. The same thing happens for moving keys. In 3ds Max, just select the key and move it wherever you want. In Maya, to select a key you first have to SHIFT-Left Click on the key to selected. The key will turn red. Then, you can move it.

To delete a key in 3ds Max, select the key and press the Delete key in your keyboard. In Maya, put the timeline cursor over the key you want to delete, RIGHT-Click to open the menu and select Delete.

Additional Notes

These are some things that is worth to mention but that do not fall into any of the topics I've just mentioned:

- In Maya, changes in the timeline are undoable. In other words, whenever you scrub the timeline using hotkeys or by using the timeline cursor, you can undo the action. I have a post that explains a way to avoid adding those actions into the undo queue.

- In 3ds Max, adding  a key in the middle of your timeline (let's say frame 35) will automatically add a key in frame 0. You can stop this behavior by turning off that feature in the Preferences\Animation menu, under the "Auto key On" option.


So, I have to say every time I work in Maya there are moments that miss the 3ds Max timeslider. I believe it's easier to work with, and the fact that you can filter what translation keys to show, plus the simplicity to copy, move or delete keys, places it on top of Maya's timeline.

Next (and last topic) in the review: Everything else! A list of difference that I believe is worth mentioning between these two programs... Stay tuned! :P

Sunday, April 15, 2012

3ds Max vs Maya: Part 1 - the Curve/Graph Editor

Originally, I wanted to do only one post about the differences between both 3D packages, but when I started I realized that it will take more than just one post. Hopefully, it will be only two... Or three. :P


A lot of things have been said about which program is better: 3ds Max or Maya. I have some colleagues that prefer Max, while others die for Maya. And whenever one of each get together, a long (and sometimes heated) discussion starts, with no clear winner.

The choice of software sometimes depends on which software you learn first and which one you constantly use. However, that's not always the case. I know some animators (like me, for instance) that learned 3D on one of them, but prefer the other. Truth is, when you get use to the specific workflow of one them (i.e. shortcuts, viewport handling, technical issues), it's hard to change it, or it seems the other one is missing features "so obvious" that the software becomes useless.

In this post I'll try to cover most of the differences from an animator point of view. I will not be talking about modeling or rendering or lighting or anything else not related to animation, since I don't know all the features of each package (which are a LOT!).

Another thing that is worth to mention is that I'm comparing both programs on the same "yearly" version. I'm using the 2010 version of both 3ds max and Maya, so maybe some of the features I mention here have been upgraded in recent versions. If so, put it in the comments!

Finally but no less important, this is my point of view. Take it as that, just one opinion. If you disagree with what I say, that's cool.

So, into the review...

Graph Editor


Both, Maya's Graph Editor (left) and 3ds Max Curve Editor


First in line is every animator best friend: the good ol' Graph Editor, a.k.a. Curve Editor in 3ds Max. In general, both editors do the job right but there are some small differences that are actually not so small for some people.

Tangent Selection

In the Curve Editor (CE) in 3ds Max, the tangents are part of the key, in the sense that if you want to move the tangents, the key must be selected. In the Graph Editor (GE) in Maya, the tangents are independent objects from the keys. So in order to move a tangent, you have to select a key and then select the tangent. Basically, in 3ds max it's easier to select the tangents, but in Maya you can select (and adjust) multiple tangents at the same time.

Breaking Tangents

Another difference in the tangent handling is the way you break them. In the CE, if you want to move one tangent independently from the other one, you just have to press SHIFT and that's it. In GE, there is a button in the toolbar called "Break Tangents" (see image), which is a command to break the tangents of the selected key.

Breaking tangents toolbar in Maya


So it might seem like an additional step, but the problem in the CE comes when you want to unify the broken tangents while keeping the changes you did when you broke them. In GE, you just press the "Unify Tangents" and it's done. In 3ds Max, you'll have to follow this procedure.


Tangent types

The tangent type toolbar is a bit different for both programs (see image).

Tangent type icon comparison
The CE gives you the option to change each tangent to a different type (ease-in ease-out, linear, etc) from the toolbar by means of drop-down buttons (just click-hold a button and more options will appear), but changing the tangent type to something different than Auto or Custom will make the tangents disappear. In the GE, you will have to select the tangent first and then select the type of tangent you want, but in this case the tangents will never disappear.

Another thing regarding this topic is that there are some types of tangents that vary from one software to the other. While in the GE you have more variety (spline, plateau, clamped) - and in my opinion, better naming-, in the CE you'll find auto, custom, fast, slow and smooth.


Buffer curves


This is a feature that is present only in Maya, and for most animators, is a game changer. The Buffer curves allow you to take a snapshot of the f-curve at that moment in time. When you start modifying your curve, you can always go back and forth between the current curve and the snapshot (even when playing the animation) and compare how the changes affected the animation, and go back in case you screw it up.

Buffer Curves demonstration


It's worth mentioning that buffer curves are not saved with the file, so once Maya is closed, they're gone.

3ds max does not have a feature like this.

Selecting the whole curve

The only way to select the whole curve in 3ds max is to select all the keys that are part of the curve. In Maya, the curve is another object (separated from the key and the tangent). Selecting the whole curve by, well, selecting it can be very useful, but it's also very easy to select it by mistake.


f-Curve Scaling

Scaling keys is one of the things that mostly differ between both 3D packages. In 3ds max, there are two different types of scaling : Scale Keys and Scale values. The first one is used to scale keys in time only (horizontal scaling), while the second one scales the values of the keys (vertical scaling).

When scaling values, the curve is scaled from a reference point, i.e. whenever you select the scale tool, a yellow-ish reference line will appear in the CE and it will serve as your reference point to scale the curve (or keys, if you want to select only a couple of keys).

Scale Values reference line in 3ds Max

The problem with this feature is that the line will always stay in the same place no matter what you select. So let's say you scale some keys in the Y-Rotation axis between 270 and 360 degrees. If you want to scale some other keys in the Z-Translation between -200 and -300, you'll have to drag the scale reference all the way down by yourself (one workaround is to close and re-open the CE, so the reference line position will reset to its default position). It would be nice if the reference line pops closer to whatever you have selected.

When scaling keys (horizontally), the position of the time slider will serve as the reference line.

In Maya, the same scale tool that you use to scale polygons and other things in the viewport, works in the GE. So taking the same previous example, you only have to select your keys (or f-curve) and scale them as you would in the viewport (BTW, tangents can't be scaled). On this feature, I see a clear winner.


The Euler Filter!

It's worth to note that both programs have the the Euler Filter command (most 3ds Max users don't know about it, that's why I'm mentioning it), it's just that in 3ds max, it's hidden under the Utilities menu, while in Maya is found in the Curves menu. To my knowledge, both filters work properly.


Zooming

The Zoom tool is another feature that I found works better in Maya than in 3ds Max because you use the same zoom hotkey that is used in the viewport for the GE (that would be the default "f" key, that comes from the english word "Frame").

However, there are some things that I like in the CE. For example, when you have a key selected from a specific axis and you select another axis, the CE will automatically zoom to the key in that same frame, so you don't have to re-zoom every time you select a different axis (there is the Auto Frame option in the GE, but is not quite the same). Another nice feature is that in the CE you can zoom only in time (horizontally) but not in values (vertically).

For my taste (and my current workflow) I prefer the more simple "f" key.


Out-of-Range values vs. Infinity

They do the same thing: Replicate the f-curve over time so you can adjust you walk cycles (or any cycle, for that matter).

Out-of-Range window in 3ds Max

Infinity options in Maya


Basically, both tools work the same way, but there is one very small difference that make me go to Maya for this one, though it's something most people won't find it's a problem at all: in 3ds Max, when a f-curve is on cycle mode, you won't be able to add keys after the last key on the cycle. Instead, it will add a key to the equivalent frame inside your cycle. You still can add keys however, by copying an existing key and moving it on to a different frame, but you can't just hit "k" and add a key. For me, this limitation is sometimes annoying, and I feel like it's just too much work for something so simple.

In Maya, you can add keys to your cycle wherever you want. Freedom is priceless, I guess.

Bake animation

This is something that is only present in Maya and for me is not a game changer. Basically, it allows you to "bake" an animation, i.e. add a key per frame to a certain object in order to preserve the animation.

You can get the same feature in 3ds Max through a script (google it, there are a couple of scripts available), or by saving your animation through "Animation\Save Animation..." and selecting the "Key per Frame" option. Then you reload the animation into your scene.


That's pretty much it for the Graph/Curve Editor. In all honesty, I believe Maya beats 3ds Max in this area. Not by much, but it wins. The simplicity in tools like Zoom, Scale and the Buffer Curve, makes me wonder what is Autodesk waiting to implement those in 3ds Max.

Next post I'll take into one of the most used tools by animators: The Timeline (or TimeSlider).

Cheers!