Showing posts with label download. Show all posts

Friday, February 10, 2017

Links, enlaces et liens

http://boutique23.com/
Some cool rigs on sale!


https://vimeo.com/groups/gameanimFollow this group for some cool demo reels!

http://www.cgmeetup.net/home/deadpool-visual-effects-breakdown-by-atomic-fiction/
Nice breakdown from the Deadpool film

http://ryanwoodwardart.com/animation/
I think I've shared this before but it doesn't matter, still worth the reshare! :)

https://knowledge.autodesk.com/support/3ds-max/learn-explore/caas/CloudHelp/cloudhelp/2016/ENU/3DSMax/files/GUID-75E03BAB-0D94-43E0-B281-3AE3299BD2B9-htm.html
Some alternative options for those that are using 3ds max

https://www.iamag.co/features/disney-real-time-skeletal-skinning-with-optimized-centers-of-rotation/
Cool tech for skinning. From Disney, nonetheless :P

http://thinkinganimation.com/new-free-rig-mr-buttons/
Free rig!! Check a test run done by Kyle Kenworthy below...

Mr. Button's Bow Tie from Kyle Kenworthy on Vimeo.

Sunday, February 21, 2016

Links, enlaces et liens


https://www.toolchefs.com/?page_id=225
Some really good tools for Maya.

http://www.premiumbeat.com/blog/creating-the-illusion-of-speed/
Cool read with some tips about motion blur and how to create the illusion of speed.


http://www.gdcvault.com/play/1021791/Animation-Bootcamp-The-Animation-Process
The animation process behind Ori and the Blind Forest video game.

http://www.cgmeetup.net/home/making-of-uncharted-4-a-thiefs-end/
A brief behind the scenes look at Uncharted 4 video game.

http://ow.ly/Wbjrd
DreamWorks pipeline explained by Skipper

http://www.twitch.tv/finespline/profile
Ben Sanders Twitch channel. He has A TON of hours of content about animation. Worth to check it out.

https://www.patreon.com/morganloomis?ty=p
Morgan Loomis has created a Patreon page to support him create tools!  
 

Tuesday, June 16, 2015

Saturday, July 12, 2014

Links, enlaces et liens

After a long absence from the internets (due to the World Cup and overtime), I compiled a long list of links for you guys. Some of them are a couple of weeks old, but good nonetheless.

Enjoy!

http://imgur.com/rn8jhB5
Seriously, if this is his first animation, there is a huge amount of talent in one person.

http://www.theverge.com/2014/6/12/5804070/the-amazing-animation-software-behind-how-to-train-your-dragon-2
A look at the new software used at Dreamworks

http://www.penproductions.ca/scripts/trackEditor/
New tool from Paul Neale.

http://spungellaworkshop.blogspot.ca/2014/06/marianne-bell-escape-video-critique.html
Hell of a critique!

http://www.brianwyser.com/
Crazy good demo reel!

https://www.facebook.com/AdvancedSkeleton/posts/706648342733676
Three new rigs from Advanced Skeleton! Get the tool now!

http://www.nukeygara.com/
New animation software in the making.

https://sites.google.com/a/cgspeed.com/cgspeed/motion-capture/3dsmax-friendly-release-of-cmu-motion-database
Mocap database, good for reference and for motion editing practice.

http://johnkstuff.blogspot.ca/2006/09/importance-of-having-lot-of-influences.html
This is a very interesting point of view about the current state of creativity in animation. I kind of agree with most of what John says, in the way that these days, all animation looks pretty much the same. But anyways, that would be a subject for another post.

Sunday, March 30, 2014

New Page: Downloads

I've just added a new page in the blog called "Downloads". It basically collects all the scripts I've done in one place, just for easy access.

I already have the "Download" label in my posts, but I've just realized that some of the posts where I explain what the tool does had the label missing, so it was a bit hard to find them. In addition, they are all nicely separated by program, so I think it's better that way.

If you have any suggestions on how to make the site better, just let me know.

Cheers!


Sunday, March 23, 2014

3ds max scripts to modify the timeline start and end values

I created a couple of scripts that allow me easily control the start and end of the timeline. They are fairly simple and will save you a couple of seconds each time you want to change your timeline.

I would normally use the CTRL + ALT + Mouse buttons to change the values or move the timeline (with the middle button), however, when working on long scenes, it can be a bit of a pain to a frame as start or end.

So this little scripts will do the job. Here's a brief description so you know what each script does:
  • UpdateStartZero: It will reset your timeline start value to Zero.
  • UpdateStartTime: It will update the start value of your timeline to the current position of the slider. So, let's say your timeline goes from 0f to 500f and you want it to start from 333f. Just place the timeline slider to frame 333 and run the script.
  • UpdateEndTime: Same as StartTime but for the end value.
I'm planning to create some other scripts to update the end value further from the current value (i.e., to change it to 500f if your timeline currently goes to 400f) and to offset the whole timeline by a certain value, but I'll see if I need them.

If you want more control, you can also try the timeline script that is part of the JJTools package. Actually, I recommend to install the package regardless, it has some REALLY useful tools, like the Clever Move and Rotate.

Installation

As with most of 3ds max scripts, just drag-n-drop the files into the viewport. I would recommend you put them in one of your Quad menus for easy access.

Downloads

UpdateStartZero
UpdateStartTime
UpdateEndTime

Cheers and have fun!

Friday, November 22, 2013

Improve your workflow: Easy steps to make 3ds max (more) user friendly

Note: I will be updating this post whenever I find a tool that could impact your workflow and help you work faster. So, bookmark this page so you can check it later.

When I was at the 3D school, my favorite program was 3dsMax. I thought it has some features that could be better, but overall the ups where more than the downs. Then, I left school and get my first job and my first project was using Maya. And I have to say I was reluctant to make the switch, but after a while

Maya is my favorite 3D program. Coming in a close second is now Motion Builder. Sadly, the one that was my favorite is now third in my rankings. That's 3ds Max. This is mainly because I find that my workflow is slower than with any other software. Some tools (in my opinion) are poorly designed and they impact my workflow.

However, there are some things you can do to speed up and enhance your workflow.

Changing the hotkeys in 3dsMax to scrub the timeline faster

This set of hotkeys will increase your workflow so that all the playback controls will be together.

- Change the default Next/Previous Key hotkeys (by default, they are assigned to the "," and "." keys) to the Left and Right arrows.

- In 3dsMax and map the KeyMode Toggle function (known as "NextPrevious Key Mode Toggle") to the Down Key, so that you can easily switch between Next/Previous frame to Next/Previous Key.


- Change the hotkey of the UP Arrow key to play the animation.

Zooming in the Graph Editor

These set of changes in the Quad Menus will greatly improve your zooming workflow in the graph editor, making it a bit friendlier.

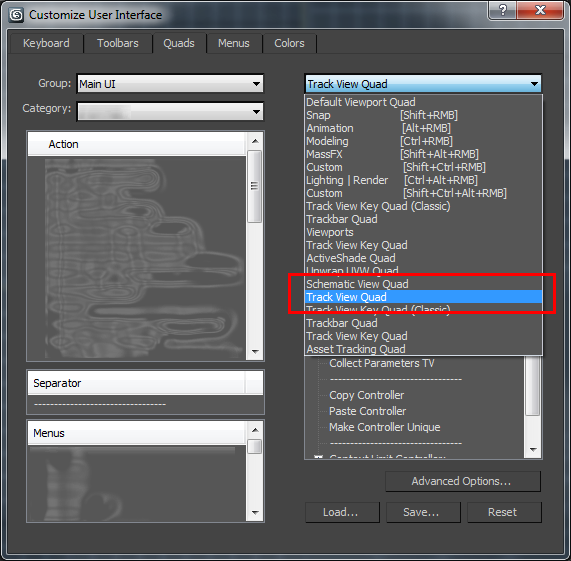
First, let's find the correct quad, since there are a couple with similar names.


Now, how to set it up. I'll show you what looks mine:


I added a couple of zooming and key-moving tools to help me out when I'm working on the Graph Editor, which is, like, all the time. Where to put the tools is up to you. I place them in that particular order for no reason really. You can do the same or find some other one that suits you better.

The Zooming tools (Values and Time) will help me zoom in one specific direction at a time. The Move Key tools do the same thing but with selected keys. So, Move Keys Horizontally will move keys in time only, while vertically in value only.

NOTE: CTRL + SHIFT + Zoom Tool will disable the default proportional zoom of the tool, hence achieving the same effect but I feel you have less control over the zoomed area.

Make the hotkeys work in the Track view

If you want to enable most of the hotkeys so they also work while the Curve Editor (or any trackview, for that matter) just activate the Keyboard Shortcut Override Toggle (toaster button).


Change position of Scale Value bar with script

I have recently uploaded a tool to update the position of the scale value tool bar in the Curve Editor. Don't know what I'm talking about? It's the annoying brown line that is always hard to find. Well, get teh tool and install it. It will save you time, guaranteed! ;)

Trajectories made better!

If you already don't know about Eric Legaré DTools, then you're missing a lot! Especially the trajectories tool called DTrajEdit. Basically, it's like the default trajectories, but better. You can even attach a trajectory to a polygon on your mesh! How cool is THAT!?

Link here

Tween Machine for 3dsMax

A friend of mine just shoot me a link about a "Tween Machine" script for 3dsMax. If you don't know what that is, it's basically a tool that existed in Maya (a script made by someone) that allows you to easily add inbetweens into your animation.

Well, it happens that artist Michael Smith created the same tool for 3dsMax.
Head over his website and check out his tutorials.

Link here.


Edit value of Scale Value bar in 3ds Max


Hello fellow animators,

I’ve just finished a tool to help you with that crappy Scale Bar that we use in 3dsMax, that one to scale. Don’t know what I’m talking about? This bar:


The problem with this bar is that I generally find myself moving it around in order to scale the keys in the Curve Editor. “What’s wrong with that?”, you may ask. Good question! Every time the Scale Values tool is selected, 3dsMax saves its previous position, so if I was editing some keys at -100, and now I want to edit some other keys at +300, I have to go all the way down to go fetch the damn bar. Sure, I can close the Curve Editor and reopen it so that the bar position is reset to its default (value = 0), but I still have to move it from 0 to 300 (or whatever the value is). All this process annoys me.

So it’s been a while that I wanted to code this little script and now that I have some time I finally did it. To install, follow these steps:

  1. To run the script, just go to the Maxscript menu and select “Run Script”. Then select the script and click OK.
  2. Now, let’s put the script in a quad, shall we?
  3. In the Customize menu, select “Customize User Interface” to edit your Quad for the Curve Editor.
  4. Select the “AnimTool” category. The script name is… Well, the only script in the category… “Edit Scale Bar”.
  5. Drag and drop it into the Track View Quad (see image below). You can put it into any of the four available quads, no worries.
  6. Close the Customize window.


So, in order to use:

  1. In the Curve Editor, select the Scale Values tool (Keys menu).
  2. Right-click in the hierarchy panel, NOT WHERE THE KEYS ARE. If you Right-click on the side where the keys are, you will deselect the Scale tool, so the script becomes pointless.
  3. Enter value. Press Enter.
  4. Refresh your Curve Editor. This is a bit annoying but I couldn’t find a way to automatically refresh the Curve Editor window after the script. You can refresh it manually just by using the middle mouse button to pan the window.


An ALTERNATIVE way is to move the scale bar BEFORE selecting the Scale Values tool. For this you can just Right-click on the side where the keys are, select the script, enter the value and then select the Scale too. The bar will appear at the corresponding value.

So, after you have read the whole thing, here's your link to download it. ;)
Cheers!

Monday, August 12, 2013

Despicable Me rig available for CGMeetup contest


Ever wanted to animated a Despicable Me minion? Now you can! There is a contest at CGMeetup about animating a minion, and there is a rig available to do so.


You’ll have to create an account to download it first, and as all good things, it’s a Maya file. ;)

Happy animating!

Sunday, December 30, 2012

Some helpful scripts for Maya

Knowing basic scripting is always useful. Sometimes, I find myself searching how to do something in a 3D package just to realize the program doesn't have the feature. When those cases arrive, I know it's time for some coding.

My knowledge about scripting languages (basically MEL and Maxscript, but learning some Python now... ;)) is basic to intermediate. I don't know the code itself, but I know how to break apart an existing script, understand it and use it to make my own. It's easy for me to understand what some commands do so I can use them the way I want.

When working with Maya, there are some things that would made my life easier, so I decided to write some simple scripts to help me on my workflow. Below are some lines of code that you can grab and use as you like. I have tested these scripts in Maya 2010 (64-bit), so I don't know if they work on other versions.


Select children 

This script will select all the children controls starting from the one you have selected.So for example, if you want to select all the finger controls, just select the first control on each finger (that would be the control closest to the hand) and run the script.

For those of you familiar with 3ds max, this would be like double clicking a control.

string $sel[] = `ls -selection`;
string $namespace = `match ".*:"  $sel[0]`;
select -hi $sel;
string $selChild[] = `ls -s -sl`;
$selChild = `stringArrayRemoveDuplicates $selChild`;
select -r `listRelatives -p $selChild`;

Limitations:
This script will select only controls that are based on SHAPES, so if your rig have some Nulls or other node type as a control, the script won't work.


Playback selection

Sometimes, when working with several viewports at the same time, the playback lags. In order to reduce such lag, this script will enable/disable the playback on just the selected viewport.

Run the script to toggle between playback in ALL viewports or just in the one selected.

if (`playbackOptions -query -view` == "active") playbackOptions -view "all";
else playbackOptions -view "active";


Add keys without disrupting the curve

I got this line from Kiel Figgins at his site while searching for a way to add keys in the Curve Editor without disrupting the curve that I already had.

channelBox -e -exe "setKeyframe -i -at \"#A\" #N;" 1 $gChannelBoxName;

This is the link to Kiel's reference of this command: Link.


Incremental Save

There are a lot of scripts that do this, so I decided to do one too! Nothing special with it, just saves the file with an incremental number at the end each time the script runs, e.g. if the file name is "Test.mb", after the script it will be "Test_001.mb".

Due to the size of the script, I decided to create a .MEL file. To run the script, place the file in your script folder (C:\Users\username\Documents\maya\mayaVersion\scripts) and add a button in a shelf with the following line (you will need to restart Maya for the changes to take effect):

source "kronIncrementalSave.mel";

Link for Incremental save file: Here

Limitations:
The file has to have a name, it can't be "untitled" or else it will save the file as "unknown_001.mb". Also, for some reason that I'm still trying to debug, the first time you run the script you will have the following error:

Error: Invalid call to "substitute".  Check number and types of arguments expected by the procedure.

I don't know why is that, but if you run the script again it should work fine.


Anyways, feel free to try them and if you want to share them, do not forget to give proper credit. ;)

Cheers!