I found this series of videos about Aaron's Blaise art tips. They're very good, but I specially liked this one. This is a very touching story about persistance. It reminds us, animators, why we do what we do and why we should always persist with our craft even when life gets only harder and harder.
Animation is Magic. And it's our duty as "magicians" to make someone else's day magical.
This is the link for Aaron's Youtube channel and be sure to check his website. He is an amazing artist and has tons of tutorials for different artistic crafts.
Found via Spungella's blog.
Cheers!
Friday, November 29, 2013
Monday, November 25, 2013
Being insecure: Tomáš Jech at TEDxExpressionCollege
This is nice talk from Tomas Jech. Remember: Always answer your colleagues text messages. ;)
Be sure to check Tomas portfolio. It's a bit old but it has some really nice shots.
Enjoy!
Be sure to check Tomas portfolio. It's a bit old but it has some really nice shots.
Enjoy!
Friday, November 22, 2013
Improve your workflow: Easy steps to make 3ds max (more) user friendly
Note: I will be updating this post whenever I find a tool that could impact your workflow and help you work faster. So, bookmark this page so you can check it later.
When I was at the 3D school, my favorite program was 3dsMax. I thought it has some features that could be better, but overall the ups where more than the downs. Then, I left school and get my first job and my first project was using Maya. And I have to say I was reluctant to make the switch, but after a while
Maya is my favorite 3D program. Coming in a close second is now Motion Builder. Sadly, the one that was my favorite is now third in my rankings. That's 3ds Max. This is mainly because I find that my workflow is slower than with any other software. Some tools (in my opinion) are poorly designed and they impact my workflow.
However, there are some things you can do to speed up and enhance your workflow.
- Change the default Next/Previous Key hotkeys (by default, they are assigned to the "," and "." keys) to the Left and Right arrows.
- In 3dsMax and map the KeyMode Toggle function (known as "NextPrevious Key Mode Toggle") to the Down Key, so that you can easily switch between Next/Previous frame to Next/Previous Key.

- Change the hotkey of the UP Arrow key to play the animation.
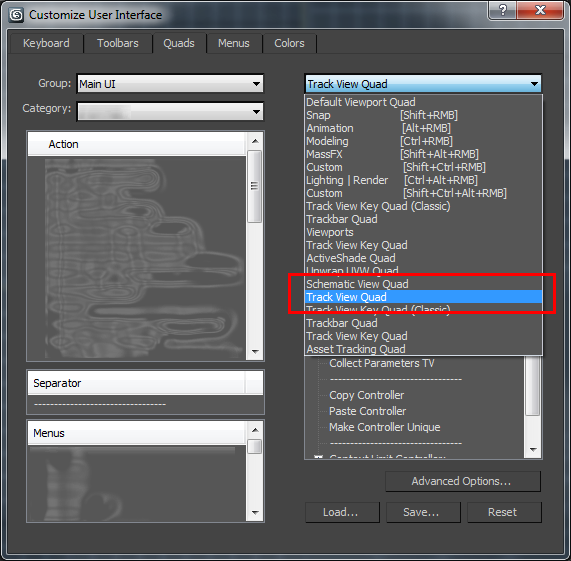
First, let's find the correct quad, since there are a couple with similar names.

Now, how to set it up. I'll show you what looks mine:

I added a couple of zooming and key-moving tools to help me out when I'm working on the Graph Editor, which is, like, all the time. Where to put the tools is up to you. I place them in that particular order for no reason really. You can do the same or find some other one that suits you better.
The Zooming tools (Values and Time) will help me zoom in one specific direction at a time. The Move Key tools do the same thing but with selected keys. So, Move Keys Horizontally will move keys in time only, while vertically in value only.
NOTE: CTRL + SHIFT + Zoom Tool will disable the default proportional zoom of the tool, hence achieving the same effect but I feel you have less control over the zoomed area.

Link here
Well, it happens that artist Michael Smith created the same tool for 3dsMax.
Head over his website and check out his tutorials.
Link here.
When I was at the 3D school, my favorite program was 3dsMax. I thought it has some features that could be better, but overall the ups where more than the downs. Then, I left school and get my first job and my first project was using Maya. And I have to say I was reluctant to make the switch, but after a while
Maya is my favorite 3D program. Coming in a close second is now Motion Builder. Sadly, the one that was my favorite is now third in my rankings. That's 3ds Max. This is mainly because I find that my workflow is slower than with any other software. Some tools (in my opinion) are poorly designed and they impact my workflow.
However, there are some things you can do to speed up and enhance your workflow.
Changing the hotkeys in 3dsMax to scrub the timeline faster
This set of hotkeys will increase your workflow so that all the playback controls will be together.- Change the default Next/Previous Key hotkeys (by default, they are assigned to the "," and "." keys) to the Left and Right arrows.
- In 3dsMax and map the KeyMode Toggle function (known as "NextPrevious Key Mode Toggle") to the Down Key, so that you can easily switch between Next/Previous frame to Next/Previous Key.

- Change the hotkey of the UP Arrow key to play the animation.
Zooming in the Graph Editor
These set of changes in the Quad Menus will greatly improve your zooming workflow in the graph editor, making it a bit friendlier.First, let's find the correct quad, since there are a couple with similar names.

Now, how to set it up. I'll show you what looks mine:

I added a couple of zooming and key-moving tools to help me out when I'm working on the Graph Editor, which is, like, all the time. Where to put the tools is up to you. I place them in that particular order for no reason really. You can do the same or find some other one that suits you better.
The Zooming tools (Values and Time) will help me zoom in one specific direction at a time. The Move Key tools do the same thing but with selected keys. So, Move Keys Horizontally will move keys in time only, while vertically in value only.
NOTE: CTRL + SHIFT + Zoom Tool will disable the default proportional zoom of the tool, hence achieving the same effect but I feel you have less control over the zoomed area.
Make the hotkeys work in the Track view
If you want to enable most of the hotkeys so they also work while the Curve Editor (or any trackview, for that matter) just activate the Keyboard Shortcut Override Toggle (toaster button).Change position of Scale Value bar with script
I have recently uploaded a tool to update the position of the scale value tool bar in the Curve Editor. Don't know what I'm talking about? It's the annoying brown line that is always hard to find. Well, get teh tool and install it. It will save you time, guaranteed! ;)Trajectories made better!
If you already don't know about Eric Legaré DTools, then you're missing a lot! Especially the trajectories tool called DTrajEdit. Basically, it's like the default trajectories, but better. You can even attach a trajectory to a polygon on your mesh! How cool is THAT!?Link here
Tween Machine for 3dsMax
A friend of mine just shoot me a link about a "Tween Machine" script for 3dsMax. If you don't know what that is, it's basically a tool that existed in Maya (a script made by someone) that allows you to easily add inbetweens into your animation.Well, it happens that artist Michael Smith created the same tool for 3dsMax.
Head over his website and check out his tutorials.
Link here.
Edit value of Scale Value bar in 3ds Max

Hello fellow animators,
I’ve just
finished a tool to help you with that crappy Scale Bar that we use in 3dsMax,
that one to scale. Don’t know what I’m talking about? This bar:

The problem
with this bar is that I generally find myself moving it around in order to
scale the keys in the Curve Editor. “What’s wrong with that?”, you may ask.
Good question! Every time the Scale Values tool is selected, 3dsMax saves its
previous position, so if I was editing some keys at -100, and now I want to
edit some other keys at +300, I have to go all the way down to go fetch the
damn bar. Sure, I can close the Curve Editor and reopen it so that the bar
position is reset to its default (value = 0), but I still have to move it from
0 to 300 (or whatever the value is). All this process annoys me.
So it’s
been a while that I wanted to code this little script and now that I have some
time I finally did it. To install,
follow these steps:
- To run the script, just go to the Maxscript menu and select “Run Script”. Then select the script and click OK.
- Now, let’s put the script in a quad, shall we?
- In the Customize menu, select “Customize User Interface” to edit your Quad for the Curve Editor.
- Select the “AnimTool” category. The script name is… Well, the only script in the category… “Edit Scale Bar”.
- Drag and drop it into the Track View Quad (see image below). You can put it into any of the four available quads, no worries.
- Close the Customize window.
So, in
order to use:
- In the Curve Editor, select the Scale Values tool (Keys menu).
- Right-click in the hierarchy panel, NOT WHERE THE KEYS ARE. If you Right-click on the side where the keys are, you will deselect the Scale tool, so the script becomes pointless.
- Enter value. Press Enter.
- Refresh your Curve Editor. This is a bit annoying but I couldn’t find a way to automatically refresh the Curve Editor window after the script. You can refresh it manually just by using the middle mouse button to pan the window.

An ALTERNATIVE way is to move the scale bar BEFORE selecting the Scale Values tool. For this you can just Right-click on the side where the keys are, select the script, enter the value and then select the Scale too. The bar will appear at the corresponding value.
So, after you have read the whole thing, here's your link to download it. ;)
Cheers!
Tuesday, November 19, 2013
Links, enlaces et liens
http://ldunham.blogspot.ca/2012/01/ldanimateme-v100.html
Animation tool for Maya. I saw it in a tutorial for a quadruped walk cycle, and it looks useful for offsetting keys and create fast tail movements. It has other applications too, so check it out!
http://kienwei80.blogspot.in/2013/09/jamaal-bradley-wise-say.html
Some inspirational words from Jamaal Bradley.
http://www.animatorisland.com/how-fast-should-you-animate/
An answer to a typical question. My short answer: Always animate as fast as you can with the best quality possible. Don't bother about the rest.
http://forums.cgsociety.org/archive/index.php/t-394834.html
Not sure if I have already post this, but I'll put it here anyways since lately I came across with a rig without the proper axis rotations.
http://area.autodesk.com/blogs/louis/switching_cameras_in_an_animation_in_3ds_max
Finally, a tutorial to setup a camera switcher in 3ds Max. I don't know if the latest version has something like this already implemented, but for those working on previous versions, this should be GOLD!
Cheers!
Ryse: Son Of Rome - The Making of a Hero (comic con 2013)
I like the way they have set up the helmets to capture the facial animation. And it's crazy the amount of bones they have for the main character! This is one of the benefits of the next-gen consoles: More bones, better animation and, hopefully, no compression.
Enjoy it!
Enjoy it!
Friday, November 1, 2013
Progression Reels - Jeff Gabor and Cesc Pujol
Here are a couple of progression reels from animators Jeff Gabor and Cesc Pujol.
What impresses me the most about Jeff's video is how much detail he puts into the blocking process and how much is trimmed before the final animation.
Ice Age:Continental Drift Progression Reel from jeff gabor on Vimeo.
Cesc's video is interesting because it shows a mix of live reference and thumbnails. Again, compare the difference in the subtleties between the blocking and the final animation and you'll see a lot of changes.
Wine Tasting Process from cesc pujol font on Vimeo.
Subscribe to:
Posts (Atom)